Contact Dermititis Misery

I am getting so fed up, it has taken nearly a year for my doctor to tell me what I have on my hands. They have been so painful and annoying I haven’t been able to do anything without it getting covered in grease!!!! Some weeks are better than others and I can get a little done, but my hands are so dry, itchy and sore. Contact Dermitits sucks!!!! I hate not being able to sew. This is why I have not been on my blog for a while. Just waiting for an appointment with the hospital so I can have a patch test done to see what is causing it. I have changed everything from soaps, washing powder, wearing gloves etc but it still keeps coming back.

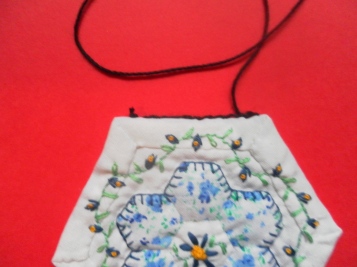
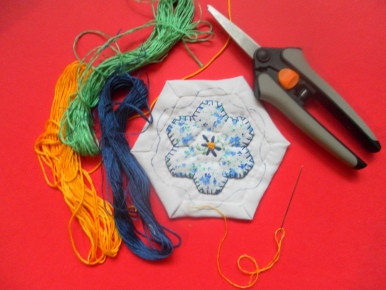
Anyway, just as a fill in I will show you my little sewing packs for my Quilt as you go Hexie quilt. I do so enjoy making up little kits so I have everything to hand when I am in my cattery. I can just whip out a little bag and get started without having to hunt for needles, floss etc.

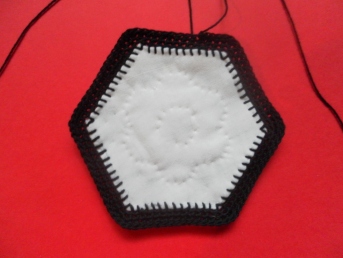
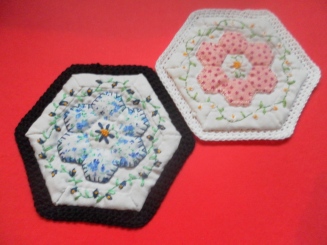
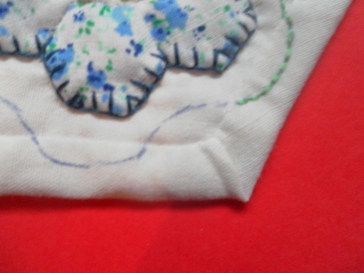
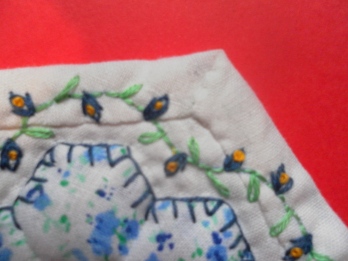
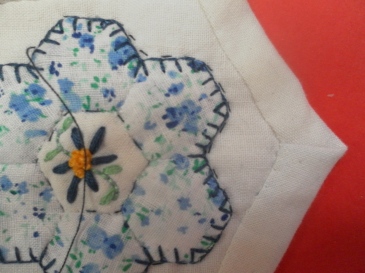
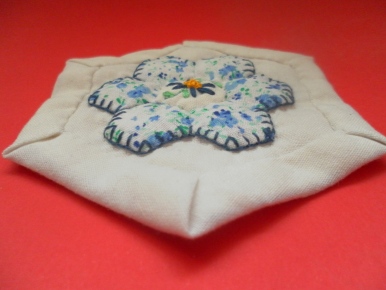
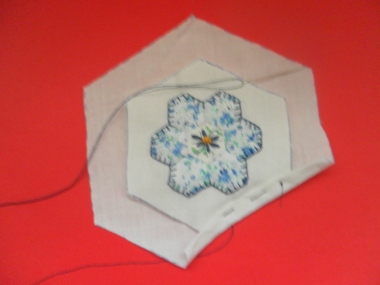
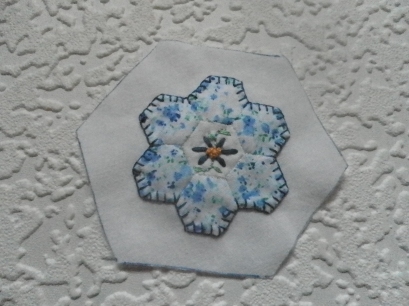
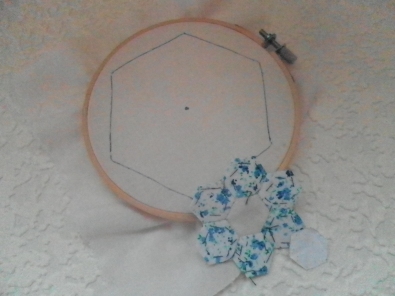
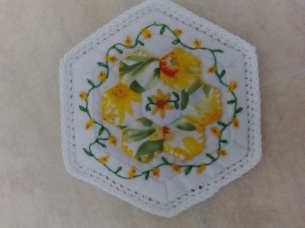
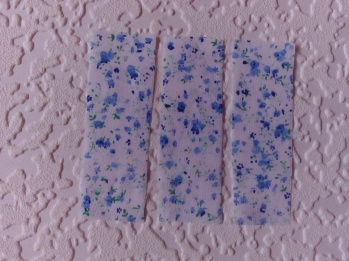
To start I appliqued 80 yes 80 little patchwork flowers onto the backing squares. To each little bag I included this hexie, a wadding hexie and a backing hexie. Along with a just enough stranded floss of the colours I needed.

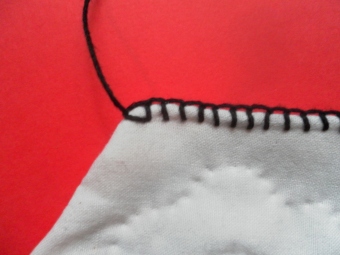
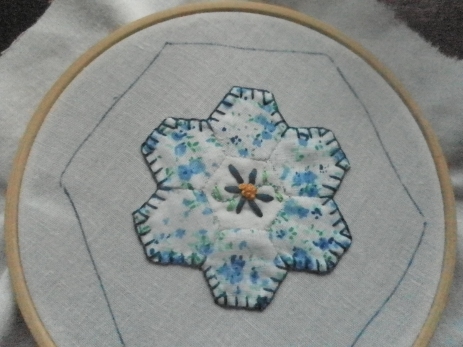
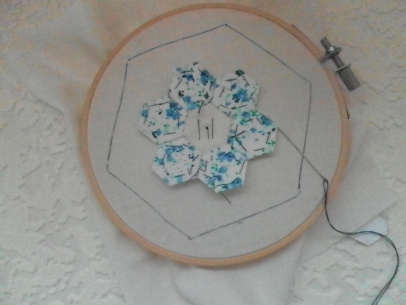
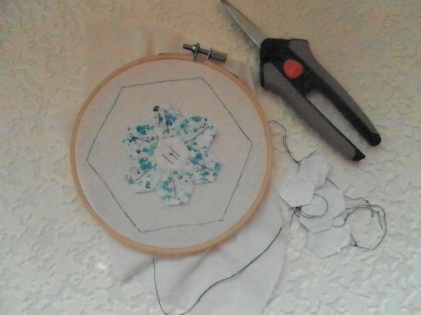
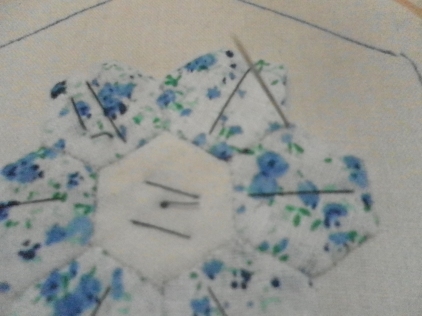
I’m quite methodical, so I embroider all the little flowers, then I go back and put the backing hexie together, then I go back and embroider all the completed little hexies. So it takes quite a while to get through the whole box.

But with different techniques going on it is never boring!

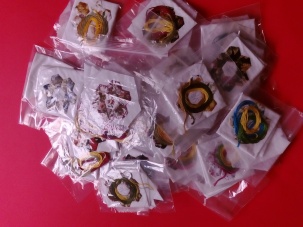
All the little bags are kept in a plastic box, that has a lid and a carry handle, (only cost me £2.50 new). Also in the box I have scissors, fabric pen, needles, tacking thread, sewing thread and a small embroidery hoop. I can get around 12 of these little filled bags in the box, plenty for me to get on with. When my hands feel a bit better.


7. Crochet Border Around the QAYG Hexie

I could just stitch all of the little QAYG hexies together like an ordinary patchwork quilt. But the cotton sheeting I am using does stretch a little and I don’t feel that I could make a neat job of it. As I love to crochet and it is nice and quick I thought I would put a crochet border around each hexie and then either sew them or crochet them together. As the crochet will stretch a little as well they will all fit together without any stress.

I will be using 4ply white cotton yarn for my hexies, but for this demonstration I will be using black so you are able to see it more clearly. You will also need a sharp needle with an eye big enough to take the 4ply yarn and a 1.75mm crochet hook.

Using a long piece of yarn, you need to do this part with one piece, and a sharp needle with an eye big enough for your yarn, begin to do blanket stitch all round your hexie. For the blanket stitch you will put your needle in at the back side of the hexie, slide between the layers and come out right on the outside fold. The stitches must not show on the front of the hexie.

We will be working from the back side so it will look as though the hexie is floating on the crochet border. I don’t measure or calculate, life is too short…….my stitches are about 1/2 cm apart and 1/2cm deep. When you make the loop at the top don’t pull too hard we want to keep the shape of the hexie edge.

When your near the first corner go in the same hole as the last stitch and up on the other side. Do not pull the yarn too tightly round the corner.

When you have blanket stitched all the way round, finish off with a knot, slide your needle under your stitches through the layers of fabric and cut off the excess yarn.

Leaving a fairly long tail join your yarn to one side of the hexie, you can work from the back or the front, back is easier, and using double crocher (UK) crochet along one edge. When you get to the corner make 2  double crochet in this loop. One double crochet in each loop of the blanket stitch until you reach the next corner, make 2 double crochets in the corner loop and so on. On the second and third rows when you come to the corner do 2 double crochet in one stitch.

That is all you need, just 3 rounds of double crochet. Finish off with a long tail. Thread a tail of yarn on to your needle make a knot and pull through the layers of your hexie and blanket stitch so that it is neatly hidden.

Now all I need to do is make 100’s more of these lovely little QAYG hexies, sew them together and finish my quilt!!!! I hope you enjoyed my quick tutorials, if you have any questions please contact me.


6. More Embroidery on the Hexie

I didn’t want too much white going on in between the hexies when I finally put them altogether for my quilt, so decided to do a bit more embroidery. This seemed to make the little hexie flower in the middle pop, and it didn’t matter how ugly the fabric pattern was. The embroidery is very simple but does make a difference, and I think complete the hexie beautifully!

You will need: your finished QAYG hexie and the three stranded embroidery threads you used for the central flower and leaves. On my one it is green for the vine and leaves, dark blue for the flowers and yellow for the little stamens in the centre of the flowers.

On the hexie with your fabric pen, or sharp pencil, draw a wavy line around the hexie flower. Not too close to the flower, and not too close to the edge of the hexie. This will be the basis for the embroidery.

Here is where the little corner pockets on your hexie come in to play. Knot your thread and use the little pockets to hide the knot. Go into the pocket and bring your needle up on the line you have drawn. Keep all of your embroidery on the top of your hexie. Sliding your needle between the layers. We don’t want to see any embroidery threads on the back, spoiling your quilting. Using your line as a guide and 2 strands of green embroidery thread Back Stitch all the way round on your drawn line. Keep your fingers at the back of your work so you can feel if the needle goes all the way through. Keep the needle in between the layers, so none of the embroidery shows on the back side of the hexie.


When you get to near the end of your thread find the nearest pocket and slide your needle between the layers, open out the pocket and come up behind it, as in the photo above. do a little knot.Cut the thread and fold back the pocket to hide the knot. Do this with all the knots.

Vine finished and knots hidden.

None of the embroidery showing on the back side.

I spent an age on the internet trying to find little flowers to embroider that weren’t too heavy or complicated. I wanted something delicate and quick. The little embroidered flowers are made using Tulip Stitch, you will find a tutorial here.  I stitched them randomly on the vine, with enough gaps in between for some lovely little green leaves. I have used 2 strands of the dark blue embroidery thread. All the knots have been hidden again in the little pockets. Don’t go too close to the edge of the hexie with the embroidery as the crochet border might get caught up in it.

Next, fill the gaps in between the flowers with little Lazy Daisy leaves. Using 2 strands of the green embroidery thread I made my Lazy Daisy stitches a little bit longer so they give the effect of leaves.

For the finishing touch to the little flowers I have used 1 strand of yellow embroidery thread and put a little French Knot into the loop of each flower. That is all of the embroidery finished. Now to close up all the little pockets and cover up those horrible looking knots.

With white cotton thread sew up the little pockets without going all the way through the hexie.

The back of your hexie after all of the embroidery should look like this. Nothing showing except your lovely quilting!

In Part 7 I will show you how I crochet a border around the hexie ready for making up into a quilt.

Save

5. Quilting The Hexie

I am no quilter, but I have found that just by doing a small running stitch I achieve what I think as quilting. I use an ordinary sewing needle and ordinary white cotton thread on these little hexies.

The quilted part to do on this hexie is around the centre of the flower and around the outside of the flower.

With white cotton (I have used blue so that you can see my stitches) make small running stitches around the centre little hexie,  through all the layers. It doesn’t matter if they are not even, once done they will blend into the background and will make your little design puff. Do the stitching in the ditch (the seam line around the white centre hexie).

This is what it looks like on the back.

And this is the front.


Now do the same little running stitches just around the outside of the flower.

This is what it looks like on the back, as you stitch pull the thread fairly tight so the layers come together and you get the quilting effect.

As you can see done in white cotton thread, you now have a perfect flower outline puffing up on the back of your hexie. And who is going to worry whether your stitches are all the same length?

In part 6 we will be doing some more simple but pretty embroidery.

4. QAYG Hexie

The hexie we have just appliqued and embroidered will be used as the centre part of the Quilt As You Go hexie.

For this part you will need: Your completed 2″ hexie (appliqued and embroidered), 2″ hexie of 2oz polyester wadding, 3″ hexie of white cotton sheeting.

I use 2oz polyester wadding for everything, it is nice and cheap and can be doubled up if I need something to be thicker or like these little hexies I can iron it to make it thinner and more stable like soft cardboard instead of spongy. To do this, on an ironing board I lay a piece of wadding then cover it with a piece of cotton fabric, and using a hot steam iron I iron the wadding until it flattens. This makes it easier to draw round the 2″ hexie template and cut the wadding.

Place your appliqued and embroidered hexie on top of the wadding hexie, place these two in the centre of the larger 3″ hexie. It helps to either pin or put a couple of large tacking stitches through the centre of all the layers to keep them in place.

Now to put these altogether to make one complete lined hexie, you fold one side of the larger hexie so it touches the edge of the smaller one.

The next step is to fold again over the top of the smaller hexie.

Take a threaded needle that has a knot at the end and tack a few stitches to keep this fold in place.

For the second edge, fold once to the edge of the centre hexie, then fold again over the centre hexie and tack making sure to do a stitch over the corner to keep it flat.

Do the same for the other sides until you have the hexie looking like the above photo.

To complete this stage using white thread (I have used a dark thread so that you can see how my stitches are)  do  the same stitch as you did when you appliquéd, come up with your needle  just under the top layer and go back down through the same hole. All the way round. Do not go all the way through the hexie. Use the little open corner pockets to hide your knots.  You may have to jiggle your corners a bit so they match, put a couple of little stitches here to keep them sharp and tight. You shouldn’t see any stitching at all on the back of your hexie.

You will notice that the corners are like little pockets, don’t worry, leave them as they are, we will use them later, then later still they will be stitched closed.

Remove all the tacking stitches and now you have a nearly completed QAYG  Hexie.

In Part 5 we will do a little quilting.

3. Embroidery On The Hexie Flower

For the embroidery on the hexie flower you will need stranded embroidery threads: a green for the stems and leaves, a colour to match your flower hexie, and a yellow for the stamens in the centre of the flower. Here I have a lovely dark blue and light green.

Around the outside edge of the hexie flower I have embroidered a Blanket Stitch. (There are videos on Youtube showing how to do this stitch). I have used 2 strands of embroidery thread.

This is what it looks like on the back.

With the fabric pen or pencil draw the centre design. I wanted something quick and simple, as I am not an embroiderer!! So I just drew six lines for the petals and 2 small curved lines for the stems.

The petals are just a straight stitch. With 2 strands of the embroidery thread on the needle, come up at the bottom of the line then down at the top of the line. Now do that 5 more times, coming up through the same hole and down through the same hole. You now have one petal. Do the same for the other 5 lines you drew.

The curved lines are the stems and were made with little Back Stitches following the drawn lines. I added two leaves to each stem using a Lazy Daisy Stitch. Use 2 strands of embroidery thread for this embroidery.

To complete the flower, and using 2 strands of yellow embroidery thread, fill in the centre with French Knots.

This is the finished hexie.

Remove the work from the embroidery hoop and cut the hexagon out following the drawn outline.

Embroidery stitches: Back Stitch, French Knots and Lazy Daisy Stitch are explained here

In Part 4 we will construct the ‘Quilt as you go hexie’.

Save

2. Applique Hexie Flowers

Now that you have hundreds of little hexie flowers (or maybe one) we can go on to part 2, the applique:

For this you will need the 2″ hexie template, with the hole in the middle, a 5″ embroidery hoop, needle and thread and a square of white cotton sheeting for the backing.

Tip: I have cut my double sized cotton sheet into 7″ squares, these fit nicely into my embroidery hoop and are also big enough for the large hexie you need to finish off the quilt as you go part.

Take one 7″ square of white cotton sheeting and  place the 2″ cardboard hexagon template in the centre, draw round it and also mark the centre using the hole in the middle. Put this piece of fabric into your embroidery hoop.

Take one of your hexie flowers and carefully remove the centre paper template by taking out the tacking (basting). Now remove all the tacking (basting) around the other 6 petals, DO NOT REMOVE THESE PAPER TEMPLATES YET!

Once you have taken out all of the tacking stitches, using your needle and thread (with knot on the end) put your needle through the centre of your hexie flower and using the centre mark on your fabric go through the fabric on your hoop.

Do a couple of large stitches in the centre hexie to stop it from moving.

Now remove the paper template from one of the petals by lifting the petal and carefully taking out the paper, the fabric should automatically fold back under, put a long stitch on this petal, do the same for all six petals. Finish off with a few stitches in the last petal, do not knot.

You are now ready to applique your little flower.

With your needle and new thread, knot your thread. Using tiny stitches appliqué the flower onto the background. Coming up with your needle  just under the petal and going back down through the same hole, making a little stitch every 1/4cm or so, all the way round.

When you have finished, remove your tacking stitches.

In part 3 we will do a little simple embroidery.

1. Patchwork Hexie Flowers

When I was younger I tried learning how to do patchwork with instructions from a book………. I gave up, everything had to be so precise, for each piece of fabric you needed two templates, the second one being exactly 1/4″ bigger than the main one. Every stitch needed to be regular, the back needed to be as neat as the front…………….not me at all, I needed to be able to get on with it. When you are hand stitching patchwork you don’t really need to be that exact, it doesn’t matter how much fabric is at the back.  After all no-one is going to see it once the backing is on. My little 1/2″ paper pieced hexies are so quick to make up, not frustratingly precise on the back, and fit perfectly together. Here’s how I do them:

Print and cut out  your 1/2″ paper template hexies. This ladies website is brilliant for explaining how to do your paper templates http://www.getasquiltingstudio.com/2013/01/tips-for-cutting-hexagon-templates.html

4″ fabric squares, I buy them in mixed packs

Cut each square of fabric into 9 little squares, as shown, you don’t need to be accurate, as long as when you place a paper template onto a square you have a border of fabric large enough to fold over on all sides.

Thread your needle with ordinary cotton, and tie a knot. (It doesn’t matter what colour cotton you use as this will be taken out later).

Holding your template, on the back side of the fabric fold over one side of fabric press down  with your fingers and make one tacking stitch through the fabric and paper template.

Fold over  the next side and stitch over the fold on the corner, making sure you are folding over your template, you will be able to feel your paper through the fabric, don’t fold the template. When you have done this a few times it will become easy. Keep doing the same with all sides and finish with two tacking stitches, do not knot the end.


First little hexie ready. Now do as many as you want. For each of my little flowers you will need one white hexie for the centre and six outer ones for the petals.


When you have your seven little hexies you can make your first flower. With the white hexie in the centre join the ‘petals’ around it by putting the two right sides together and using little ‘whipping’ stitches, catching a few strands of fabric on each hexie. (This ladies website has brilliant instructions http://www.jessiefincham.com/2014/07/english-paper-piecing-basics-week-2_29.html )

I have made loads of little coloured and white hexies and threaded them in sets on to a long strand of cotton, so they are all ready to be stitched into flowers. Sometimes I sit and put the flowers together, or I make more little hexies, depending on how much time I have or how I feel!!

Part 2:  We will applique the flower onto our first 2″, white hexie.


Save

Save

Tina’s Scrappy Vintage Hexie Quilt Tutorial


I have never been any good at matching fabrics, colours etc, and have become quite despondent at the beautiful quilts other people can create. I also don’t have the kind of money to buy meters of beautiful matching fabrics. My idea includes thrift shop sheets, packs of mixed fabric squares, polyester wadding, and stranded embroidery threads to make a scrappy vintage quilt.

I hope you enjoy all the different stages of my tutorial for Tina’s Scrappy Vintage Hexie Quilt :

Fabric

I found the easiest way of getting different colours and patterns of fabric was to buy packs of 4″ fabric squares. I can get 9 little hexies out of each square of fabric, so out of 25 fabric squares I can achieve 225 hexies!!!!! It doesn’t matter how thin the fabric is as you will appliqué it to the base fabric. The base fabric is white cotton sheeting. I buy white cotton sheets at the second hand shop for around £3.50 for a double sheet.

Wadding: I always use 2oz polyester wadding.

Things you will need:

Templates

You will need 3 different sized templates, a small one for the patchwork flowers, a middle sized one for the inner of the Quilt As You Go Hexie, and a large one for the finishing. There are lots of sites out there that show you how to make your own templates. For the small 1/2″ I use Word on the computer, copy and paste as many as I can on one sheet of paper and print them out. Alot easier than trying to draw them.

Template for 1/2″ hexie patchwork: For the patchwork flowers you will need lots of 1/2″, printer paper thickness, hexagons

Template for centre hexie: You will only need one 2″ hexagon, print out or draw this hexie and glue or double sided tape it to a piece of thick cardboard, making a hole through the centre.

Template for outer hexie: You only need one 3″ hexie, print or draw it and glue or double sided tape it to some cardboard.

Decoration

 Embroidery thread: I found 100 mixed colours of stranded embroidery threads for under £5 plus free p+p on the Internet. These threads will last me for ages as I am only using 2 strands out of 6 and only 3 different colours for each hexie. And there always seems to be a colour that will match my little hexie flowers.

Yarn for the crochet edging: I love the Internet for bargains, and found that I could buy a large 500gm cone of 4ply cotton yarn for under £15 including p+p which will probably last for at least 1/2 a kings size quilt if not more.

Equipment

Embroidery Hoop: I do recommend having an embroidery hoop as part of your equipment, I have a small 5″ hoop, just big enough for the 3″ hexie shape.

Crochet hook: I use a 1.75 mm so that the crochet is small, but not too tight.

Needles:

One ordinary sharp sewing needle for tacking, patchwork, applique and quilting

One for the embroidery, you will need to be able to get 2 strands of embroidery thread through the eye.

One needle for the outside prep for the crochet, this will need to have an eye large enough to take 4ply wool but sharp enough to go through the fabric.

Fabric Pen or Sharp Pencil: To draw your embroidery lines.

Next time we will begin the process, I will show you how I do my little Easy Paper Pieced Hexies.

Save

Save